How to prepare files for cassette tape production?
When ordering a cassette, you want your final product to look its best.
Technical preparation of files and selecting the appropriate printing methods for both the cassette and the cover are just as important as the creative design itself. Properly designed and exported graphic files also result in a shorter turnaround time for the order. So, how do you design graphic files to create an impressive product using production technologies to its max capabilities? Here’s our guide!
How to Choose the Best Print for Your Cassette?
Modern printing technologies offer several options for printing the label on a cassette tape. Each method - pad printing, UV printing, and stickers - has its pros and cons. The best method depends on the final effect you want to achieve, the quantity of production, and the design itself.
What is the difference between pad printing and digital printing on a cassette?

Pad Printing on a Cassette
Pad printing involves applying ink directly to the surface of the cassette using a soft, smooth stamp called a pad. It’s ideal for simple vector graphics and small texts due to the high resolution of the print. However, pad printing on a cassette can only be done in one color due to technological limitations.
Available colors can be found here: [Pad Printing Color Chart]
InkJet Digital Printing
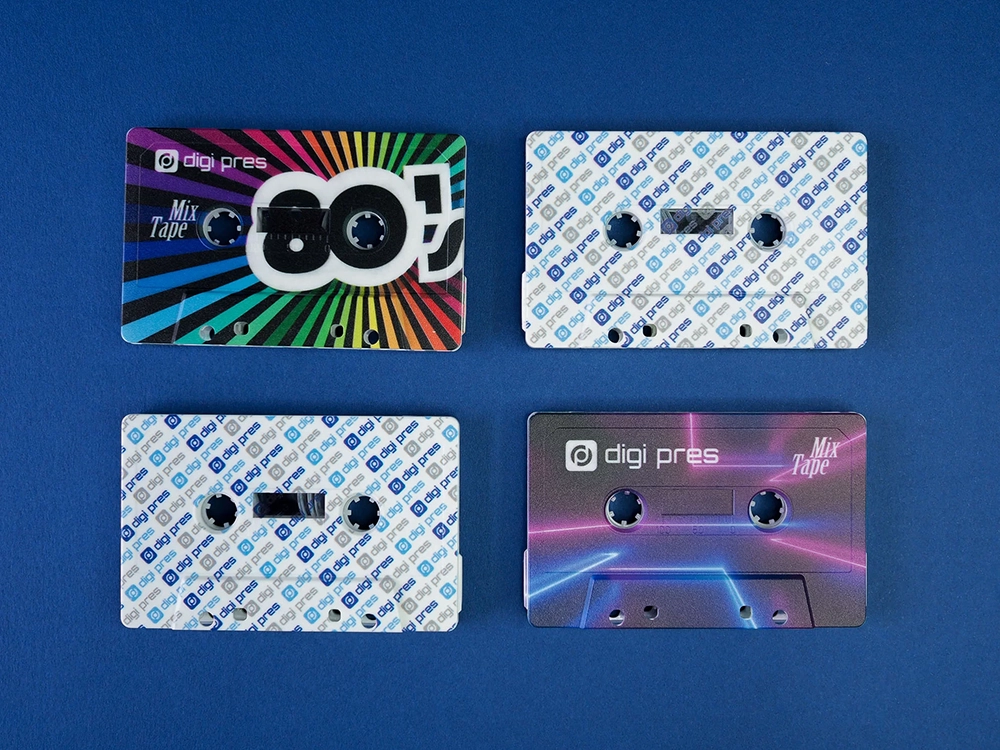
UV print label is applied to the surface of the cassette using the Inkjet method and is cured with a UV lamp. This type of printing can cover the entire surface of the cassette (known as Fullface) or be applied in specific areas. Digital printing directly on cassettes is perfect for multicolored graphics, photos, and rendered backgrounds. However, we do not recommend this method for designs with small texts, which may come out blurry or smeared.
The effects achievable with UV printing on cassettes include:
- Solid: Full coverage when applying a white underprint or non-transparent C-0.
- Transparent: No white underprint, resulting in a semi-transparent effect.

Sticker with Digital Print
A label sticker for the cassette is a full-color sticker digitally printed on self-adhesive paper. The quality of this print is comparable to offset printing. It’s suitable for both raster graphics and small texts. However, with very dark artworks, white frames may be visible on the edges of the sticker due to the scoring knife.
Choosing the Best Printing Method
As you can see, there is no one-size-fits-all answer to the question of which cassette print is the best—it all depends on the design and the intended final effect. Each technique has its pros and cons. If you are unsure what will work best for your idea, our specialists are here to answer any questions.

How to prepare a print design for an audio cassette?
If you have already decided on a specific technology, download the appropriate cassette print template and follow the guidelines.
Requirements for files for pad printing:
- Acceptable file formats: PDF FLATTENED.
- Dimensions: 1:1 scale.
- 1 color, 100% saturation.
- Vector artworks preferred.
- Resolution: 300 dpi.
- Placement of important graphic elements and texts – 3 mm from the cutting line.
- 3 mm bleeds on each side.
- Recommended LZW compression.
- Typography: minimum value for single-elementtypeface is 6 pt; for two-elementtypeface is 7 pt.
Requirements for files for UV print / label stickers:
Follow the guidelines for preparing print files as outlined below for Jcards.
Is the label ready?
Time to prepare the cover.
For both a printed O-card and a plastic case with a J-card cover, the technical requirements for the files are similar. Depending on the chosen packaging, you will need one of the templates available here: [Templates]
Requirements for files for Jcards, Ocards and slipcases:
- Acceptable file formats: PDF FLATTENED – without layers and transparency.
- Color mode: CMYK, with no additional profiles embedded (or with preset profile Coated Fogra 39 (ISO 12647-2):2004).
- Dimensions: 1:1 scale (in multi-page artworks dimensions are constantfor all pages).
- 3 mm bleeds on each side.
- Resolution: 300 dpi. For color and grayscale images with a resolution higher than 350 dpi, we will automatically reduce them to 300 dpi. Sending artwork with a lower resolution than the minimum means accepting a reduction in the quality of reproduction of a given photo.
- Placement of important graphic elements and texts – 5 mm from the cutting line.
- Maximum ink levels for coated paper 320%, for reverse board or uncoated paper 250%.
- The minimum ink level is 6% – below this value, objects will not be visible in print.
- If the artwork contains PANTONE colors: they must be prepared as a separate additional color in the project or in a separate file with dimensions identical to the project file.
- Typography: minimum value for single-element typeface is 6 pt; for two-element typeface is 7 pt. Below that size, we can’t guarantee sharp printed letters, especially for lightfonts.
- Black text on a colored background (CMYK) must be overprinted - to achieve deeper black in the print, it should be generated using all 4 colors. The recommended components are C 60, M 60, Y 60, K 100.
- Production files should not contain additional information, template lines or cutting marks.
- All pages should be generated using the same settings.
- Recommended LZW compression.
- Grayscale: For black and white graphics, create a grayscale using only the black channel (K).
- For greyscale enriched with CMYK, remember the proportions of 2x K compared to other inks, e.g.: C=20, M=20, Y=20, K=40.
Additional elements: spot uv varnish, hot-stamp, embossing
- they must be prepared as a separate additional spot color (100%) in the artwork or a separate file with dimensions identical to the project file.
- objects representing spot UV, hot-stamping, embossing in artwork must have an overprint attribute and should be in vector format only.
- the minimum thickness of the object/line in spot UV is 0.5 mm (negative – 1 mm).
- Embossing – objects should be larger than 2 mm.
- Hot-stamping – minimum line thickness – 0.3 mm, spacing between lines is minimum – 0.4 mm.
- The elements must be moved away from the cutting/creasing line by at least 5 mm for hot stamping and embossing, and 1 mm for spot UV varnish.
We prefer production files without additional information and markers in the project, with an additional preview file containing markers (file names must clearly specify the type of file).
If production files include additional information (e.g., die lines), they should be placed on a separate layer, in a spot color (contrasting with the prepared artwork), with the overprint attribute.
Here are some important points to remember:
The type of finishing/print enhancement used affects color appearance, and the shade of color may slightly differ from the design. Matte lamination reduces color saturation, while gloss lamination enhances contrast.
Images on a monitor will always appear brighter than in print. Therefore, ensure there is sufficient contrast between project elements (especially dark colors)—what appears visible on screen may not be distinct in print. For assurance that the print meets your expectations, we recommend creating a certified digital proof (which you can do with us or provide a finished print).